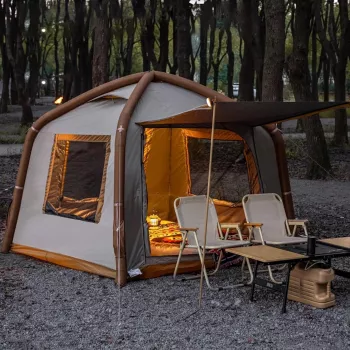
An inflatable tent with an integrated canopy takes the stress out of camp setup while adding a protected “front porch” for cooking prep, gear storage, or simply relaxing out of the sun and rain. Whether the plan is a quick weekend getaway, a festival stay, or a base-camp style trip with extra comfort, the right inflatable shelter comes down to smart weather protection, correct pitching, and simple maintenance habits that keep it performing season after season.
Instead of traditional fiberglass or aluminum poles, inflatable tents use air beams (inflatable tubes) as the main frame. That swap changes the whole experience: setup is usually faster, the structure rises as one connected unit, and there’s less worry about a pole cracking when the wind kicks up or when someone steps on a bag by accident.
Even with an “automatic” feel, air-beam tents still need proper staking and guylines. The air beams create shape, but anchors create stability. Many designs also segment the frame into multiple air chambers, so if one section loses pressure, the tent may still remain partially supported rather than collapsing completely.
This style is best for campers who prioritize quick pitching, easier handling, and a roomy footprint over ultralight packing.
A built-in canopy adds functional square footage without the hassle of rigging a separate tarp. It acts like a covered entry that helps keep the sleeping area cleaner—shoes, coolers, damp jackets, and muddy bags can live under cover instead of on the tent floor.
In rain, the canopy becomes a drip buffer. You can unzip the door, step under shelter, shake off water, and then enter—reducing splashes and runoff that tend to get tracked inside. In sun, it’s a simple shade solution for a chair or a small table, especially at midday when the tent body can get warm.
For the calmest experience, orient the canopy away from the prevailing wind and keep it fully tensioned so it doesn’t flap.
“Waterproof” on a label is only the starting point. For real-world storms, pay attention to construction details that stop water before it reaches bedding and bags. Sealed seams matter because stitching lines are common leak paths. A rainfly or outer layer should shed water efficiently rather than soaking and sagging over time.
The floor is just as important as the roof. A bathtub-style floor (where the floor material rises several inches up the wall) helps block surface runoff and splashback when the ground gets saturated.
Ventilation is part of staying dry, too. Condensation can feel like leakage, especially on cool nights or in humid areas. Keeping vents open (even slightly) and avoiding wet gear inside reduces interior moisture. After extended rain, re-tension guylines and canopy edges—taut fabric maintains runoff angles and helps prevent pooling.
For broader storm awareness and safer decisions when weather turns severe, review guidance from the National Weather Service lightning safety resources before heading out.
Most inflatable tents go up quickly, but the best results come from a consistent routine. Start with site selection: choose flat, well-drained ground, avoid depressions where water collects, and clear sharp debris that can puncture a floor. (Thoughtful site choice also reduces impact—see Leave No Trace planning guidance.)
| Step | What to do | Why it matters |
|---|---|---|
| 1. Pick the spot | Flat, well-drained ground; avoid low points | Helps prevent water pooling and uneven tension |
| 2. Lay out & stake corners | Stake the base at the corners before inflation | Stops the tent from drifting as it rises |
| 3. Inflate air beams | Pump until firm per instructions; close valves fully | Improves structure and reduces sagging in rain |
| 4. Add canopy & tension | Stake canopy points and tighten straps/lines | Maintains shade coverage and reduces flapping |
| 5. Guy out & re-check | Use guylines; tighten after 10–15 minutes | Adds wind stability and keeps fabric taut |
Once everything is anchored, do a quick walk-around: confirm valve closures, check stake angles, remove twists in guylines, and run zippers smoothly before you load gear into the tent.
Air-beam care is straightforward: keep valves clean, avoid getting sand into openings, and don’t drag the tent while it’s inflated. Over time, coatings and seam tape can benefit from refresh work—especially after heavy sun exposure. For practical cleaning and repair basics, use the steps from REI’s tent care guide.
It can, but performance depends on the tent’s design and how it’s pitched. Inflate to the recommended firmness, use every stake and guyline point, orient the canopy away from the wind, and re-tension after the fabric settles to reduce flapping.
Use vents and mesh panels whenever conditions allow, and keep wet gear under the canopy instead of inside. Avoid cooking inside the sleeping area and make sure the floor/groundsheet is positioned so moisture doesn’t get trapped along the edges.
Most models work with a hand or foot pump, and some accept compatible electric pumps with the correct nozzle. Inflate only to the stated pressure—over-inflation can stress seams, especially in hot weather when internal pressure rises.






Leave a comment